
The "Wait For Task" feature allows a user to designate a scheduling dependency for a future well on another future well based on various factors, including:
- Economic_Limit_Reached: the waiting tasks will start x days/weeks/months/years after the original well reaches its economic limit
- Time_After_Prod_Start: the waiting tasks will start once the original well has produced for x amount of time
- Time_After_Asset_Start: the waiting tasks will start once x time has elapsed from the asset start date of the original well to the current step index
- Oil_Potential_Rate_Below: the waiting tasks will start once the original well’s Oil production potential falls below x bbl/d
- Gas_Potential_Rate_Below: the waiting tasks will start once the original well’s Gas production potential falls below x mcf/d
- BOE_Potential_Rate_Below: the waiting tasks will start once the original well’s BOE production potential falls below x bbl/d
- Water_Potential_Rate_Above: the waiting tasks will start once the original well’s water potential rate drops below x bbl/d
- Steam_Potential_Above: the waiting tasks will start once the original well’s injected water potential rate drops below x bbl/d
- WOR_Potential_Above: the waiting tasks will start once the original well’s water to oil ratio is above x bbl/bbl
- GOR_Potential_Above: the waiting tasks will start once the original well’s gas to oil ratio is above x mcf/bbl
- SOR_Potential_Above: the waiting tasks will start once the original well’s injection water to oil ratio is above x bbl/bbl
Set–Up
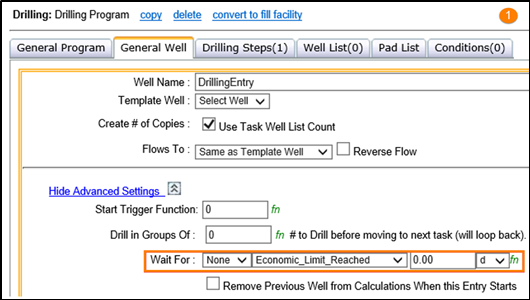
The “Wait For” is an Advanced Setting stored within the General Well tab of a Drilling Program task inside the Scheduler. In order to access it, the user must first “Show Advanced Settings”. In the descriptions above, 'x' is the numerical value the user will enter in the time or rate field box (image below):
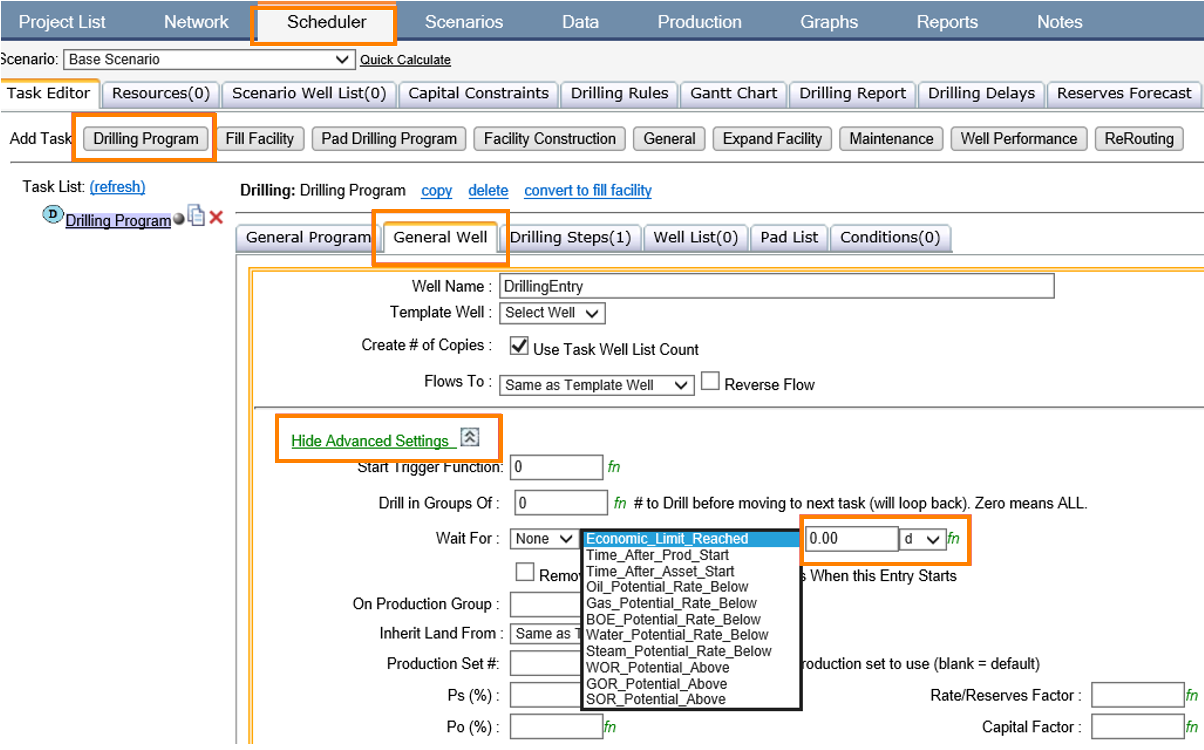
Click image to expand or minimize.
The "Wait For" setting can be utilized in a General Drilling Program task or a Drilling Program task with Multiple Well Tasks enabled.

Click image to expand or minimize.
The user must also utilize the “Wait For Task” column within the Well List. It can be accessed from the Scenario Well List tab, clicking “Select and Sort Columns to show” and checking the ‘Wait For Task’ checkbox. This causes a column called “Wait For Task” to automatically populate in the Well List.
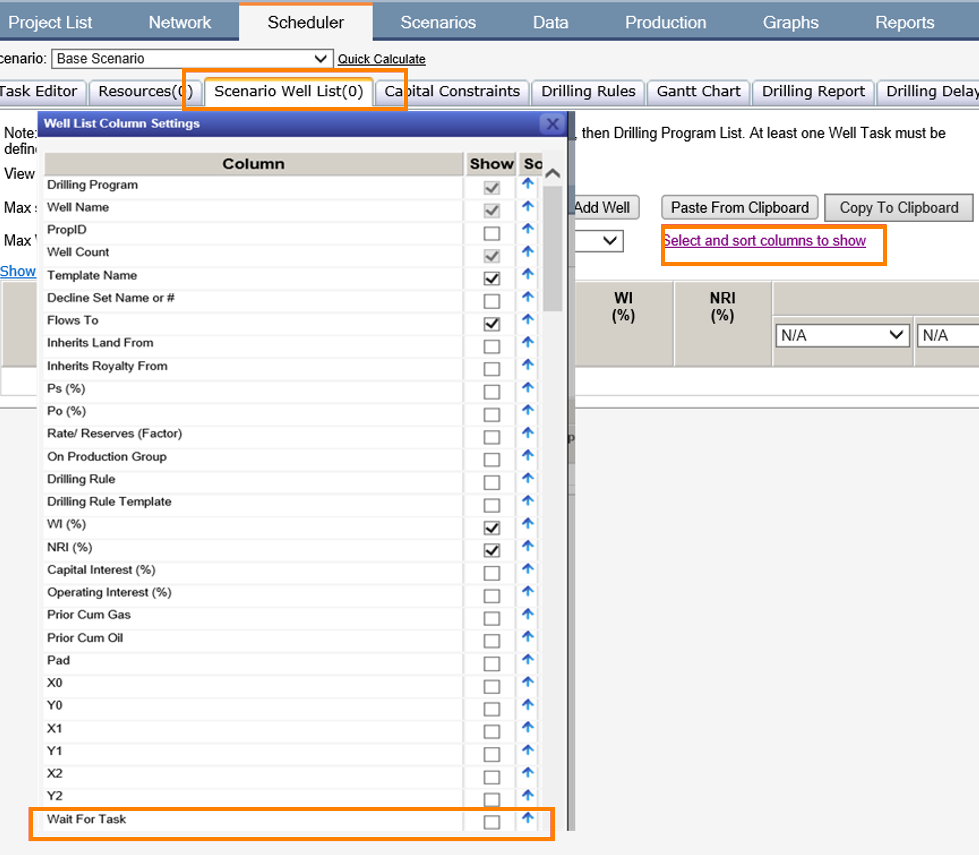
Click image to expand or minimize.
Application
This feature is generally used to model an off-shore environment where one cannot co-mingle production zones. In such a case, one well in the well list would represent the lower zone while a second well would represent the upper zone. By utilizing the "Wait For" entry, the drilling program can prohibit the upper zone well from drilling and completing until the lower zone well has been fully depleted. Typically, a user would leave the first drop-down option set to "None" and define in the Well List which well the future well needs to "Wait For."
By manually assigning a static asset in this column, the Drilling Program will, by default, use this static asset if the Wait For column of the Well List remains empty.
Below is a simple example that is representative of two offshore wells with two production zones each. In this case, we would actually model this as four wells in Enersight and utilize the "Wait For" feature and the Economic_Limit_Reached option.
When utilizing the "Wait For Task" column in the well list, this simple setup would look like the following:
- Ensure the appropriate Wait For Task and rate/time are being utilized.
- Ensure the Well List has the "Wait for Task" active and that it is appropriately populated.
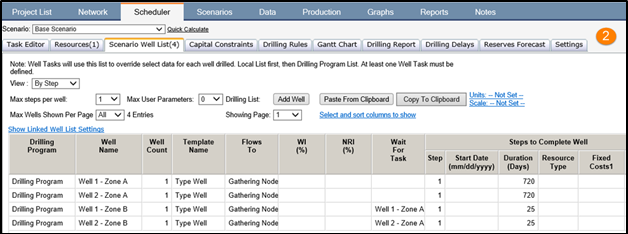
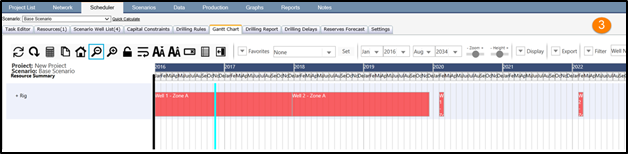
As you can see, we have the Zone B portions of both wells waiting on the Zone A portions of the wells to reach an economic limit before their 25-day Step 1 initiates. With everything setup properly, Enersight will properly schedule the Zone B wells after Zone A full depletes.
